Installing Themes

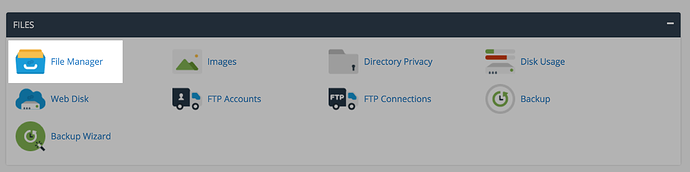
Just as you would install plugins, installing themes to Omeka is very similar. Omeka has a few themes installed automatically that you have access to. But there are more themes available at http://omeka.org/add-ons/themes. There is no automatic installer so you would need to upload the theme to your File Manager in cPanel.

Start by finding the the theme you’d like to install. Download the theme by clicking on the red button.

After, you’ll go to your specific Omeka install. Click on themes.

Click Upload.

You can drag and drop the .zip file into the window or you can click select a file.

Once your file is uploaded to the themes folder you need to go in and extract the files from the .zip folder. Click on the theme file you just uploaded then click on extract.

You’ll need to confirm that you want to extract the files. Click extract files. 

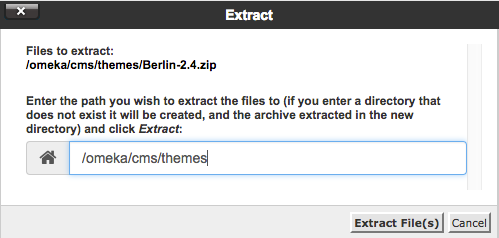
Once the theme is extracted you can delete the .zip file and the theme will now be available for activation within your Omeka administration interface.

Managing Permissions

The default Mediawiki installed has been customized to make it a bit harder for spammers to overwhelm wikis with illegitimate content and comments. This is done by modifying the LocalSettings.php file (a file that is included in every install in which it is possible to provide configurations details).

By default, Mediawiki allows anonymous users to create pages and edit pages in the wiki. The modifications change this in the following ways:

  • Anonymous users cannot edit existing pages
  • Anonymous users cannot create pages
  • Registered users must click the confirmation link in the registration email in order to edit or create pages

This approach should drastically reduce unsolicited content and comments on Mediawiki installations. One further step that administrator might take is to turn registration off after a predetermined amount of time. Users must create accounts by this date; after that, the settings are changed so that registrations are no longer open.

To add this setting, you must edit LocalSettings.php in your Mediawiki install:

  1. Login to cPanel and browse to your File Manager.
  2. In the File Manager, browse to the folder within public_html that contains your Mediawiki install. If you installed the wiki at the root of your domain, you won’t need to go any further than public_html. If you installed the wiki in a subdomain or subdirectory, you’ll need to find the directory that is associated with that space.
  3. Locate LocalSettings.php. Once selecting the file, click download in the top menu bar to download the file as a backup before proceeding. Then click Edit in the top menu bar to edit the file.
  4.  Confirm that you want to edit the file.
    Confirm that you want to edit the file
  5. Browse to the bottom of the document, and locate the custom settings that were added during the Mediawiki install and the following line:
$wgGroupPermissions['*']['createaccount'] = false;

Custom Menus

  1. Start at your site’s Dashboard and choose Appearance the Menus.screen shot of appearance menu
  2. In the Custom Menus interface that appears, type a name for your menu. This can be anything you want. It doesn’t get displayed anywhere; it’s used by WordPress to identify and place your menu. Once you’ve typed the name, click Create Menu.
  3. You’ll now be presented with a screen that includes a section titled Menu Settings. This is where you’ll indicate where you want your menu to appear in your theme. The number of locations available depends entirely upon the theme you choose. In the example shown below, there are two areas available; we’ve chosen to place the menu in the Top primary menu area which we know corresponds to the header menu. You may need to experiment a bit in order to find out where your menu will appear in your theme. You can always change this location later by coming back here and clicking the Manage Locations tab.
    custom menu settings
  4. Now that you’ve set up your menu and assigned it to a location, you can begin to add links to it. On the left-hand side of the screen, you’ll see what content is available to add. On the right-hand side of the screen, in the Menu Structure area, you can arrange and organize your links.
  5. By default, you may not see everything that is available to you to add to your menu. For example, posts can be added to menus, but they’re not usually displayed by default. To make more content available, click the Screen Options tab at the top of your WordPress screen, and then click off the check boxes that correspond to additional content.custom menu screeen options
  6. To add content to your menu, simply check it off on the left, and click the Add to Menu button.add items to custom menu
  7. Your new content will appear on the right, and you can drag items in the order you want them to appear. Drag items to the right to indent them under other items. This will usually make them appear as drop-down items in your menu.
  8. You can add custom links to your menu by clicking the Links section on the left. In the short form that appears, enter your link’s URL, and a text for the link. Click Add to Menu to move it to the left.Change navigation labels on your custom menu
  9. Note that you can change the link text of any item you add to your menu. This can be helpful if you have a page with a long title, and you’d like the link to not take up so much space. You can abbreviate the title in the Navigation Label section, and that shorter text will become the actual menu link.
  10. When you are done, make sure you click Save Menu.

Other Notes about Menus

When you add a Category or Tag to a menu, the link will take your readers to an archive of all the posts on your site that use that category or tag. This can be a very useful feature for organizing your content when you’re using posts to share your work.

In addition to assigning Custom Menus to theme areas, there is a default Custom Menu widget that you can put in the sidebar of your site. This is useful for creating smaller, customized navigation for your site.

If you forget to click Save Menu after making changes to your menu location or content, you will lose your work!

Plugins

WordPress has a lot of functionality built-in, but occasionally you might find a specific need that isn’t a part of the default software. To accomplish this, WordPress has a plugin architecture where developers can create plugins that add additional functionality to your site. From simple photo galleries to site statistics, to automatic Twitter and Facebook sharing of posts, there is practically a plugin for whatever you need for your blog (over 54,000 at the time of this writing). To start using and installing plugins just follow these simple instructions:

  1. Log in to your WordPress dashboard.
  2. From the left side menu, locate and click plugins.screen shot of plugin menu
  3. You will be given a list of all your currently installed plugins. From this menu, you are able to activate and disable specified plugins by using either the single plugin options located under each plugin name. Or you may use the bulk action drop down menu to simultaneously activate/disable multiple plugins by checking desired plugins. Additionally, you may also sort through installed plugins using the sorting options above the bulk action menu.
     
  4. To install a new plugin click add new either from the plugin sidebar or the main plugin menu, you will then be redirected to a search engine where you can search using general or specific terms to find plugins. For example, searching “photo gallery” brings up various plugins from different developers.

    Once you find your desired plugin to install it hit install now, which will automatically install the plugin and prompt you if you would like to activate it now or return to the menu.find and install desired new plugins

After installing your plugin be sure to visit the developers’ website if you have any additional questions about how the plugin works, as some plugins may require certain codes or other actions to be used properly.

Some plugins will have their own settings page located under the settings or tools categories, other plugins will break out their own menu item on the lefthand side of the dashboard. Sometimes it won’t be explicit how the plugin interacts with your personal site, so it’s important to make sure you’ve read the documentation available on the plugin’s website.

Widgets

Widgets are a more advanced feature of WordPress that allow you even more control over the content on your site. In essence, widgets are small containers of content that can be placed in various areas of your site. Where you can place widgets depends entirely on the theme you are using. Many (most) themes include at least one “sidebar” into which you can place widgets. Some themes include additional “widgetized” areas. The best way to find out what areas are available to you is to go to Appearance > Widgets and take a look at the areas listed on the right. Each widgetized area will appear as a box on the right. In the example shown below, the theme contains three widgetized areas: Primary Sidebar, Content Sidebar, and Footer Widget Area.

screen shot of widgets

On the right, you will see a number of widgets available to you. WordPress comes with some default widgets. Other widgets might become available when you have a particular theme activated. Finally, some plugins provide additional widgets to you.

Widgets can present all different kinds of information. The simplest widgets allow you to add text to your site. But you’ll also find widgets with many options that you can set to display dynamic content or to interact with other services. Below is a list of the default widgets available in WordPress.

When you’re ready to start using widgets, all you need to do is drag them from the right-hand side of the Widgets interface into the boxes on the left. WordPress will immediately save them, but you may need to set some options

Default Widgets

  • Archives: Shows a monthly listing of your posts.

    • Calendar: Shows a calendar view of your posts.
    • Categories: Shows a list of all of the categories on your site.
    • Custom Menu: Shows a custom menu that you’ve set up with WordPress’ Custom Menu interface.
    • Links: Shows your links.
    • Meta: Shows links to your RSS feed and your login.
    • Pages: Shows a menu of all of your pages.
    • Recent Comments: Shows the most recent comments on your posts.
    • Recent Posts: Shows your most recent posts.
    • RSS: Allows you to show content from an RSS feed.
    • Search: Provides your users with a search box.
    • Tag Cloud: Shows a “cloud” of the tags/categories on your site.
    • Text: Shows whatever text you enter.

Discussion Settings

What makes WordPress a powerful platform is that not only can you create a dynamic website, but you can also allow dynamic discussions about the content with your visitors. Comments, the bread and butter of the discussion, can add to the overhead of your website management. You have to keep up with responses to your commenters or they will think you aren’t paying attention. Comments also can come, unfortunately, in the form of Spam. We will give you some additional information about dealing with Spam in another section. For now, here’s how to manage your Discussion Settings.

  1. Start at the Dashboard.Screen shot of WordPress Dashboard
  2. Navigate to Settings > Discussion.screen shot of discussion settings, part 1
    • The two main forms of discussion on a website are “Allow link notifications from other blogs (pingbacks and trackbacks)” and “Allow people to post comments on new articles”.
    • Comments are self-explanatory. People come to your website, read an article, and as long as you allow comments, people can write whatever is on their mind. Commenters must leave their name and email address (if you leave that setting checked). You can also require users to be registered to your site to comment. They would then need to be logged in to submit any comments. By default, you will get an email sent to the admin account of the WordPress site when someone posts a comment, or when a comment is held in moderation. You can uncheck those boxes if you do not wish to receive those emails.
    • A comment will appear on the article (post or page) only after you approve it. If you have approved a comment author once, they will be automatically approved the next time they leave a comment on your site. If you uncheck the box labeled “Comment author must have a previously approved comment”, then all comments will appear automatically. We don’t recommend this setting.
    • You also have some control over comment moderation regarding how many links a comment contains (spammers like to put links in their “comments”). You also can filter out words, URLs, email addresses, to hold them in moderation. You can then approve them, spam them, or trash them.
    • There are also forms of discussion called link notifications. Spammers like these too. Here’s an article on the What, Why, and How-To’s of Trackbacks and Pingbacks in WordPress.
  3. Sometimes it’s nice to have visual representations of the people who are commenting on your blog. These are called Avatars and can be found under Settings > Discussion.screen shot of discussion settings, part 2

WordPress uses a common universal system of avatars called Gravatars (Globally Recognized Avatars). The system requires you to sign up with your email address. You can upload a graphical representation of yourself (a picture or other graphic). From then on you are identified with your Gravatar on any blog that you use that email address with.

In the WordPress Discussion Settings, you have a few options. Whether to show Avatars at all, the “rating” allowed to be shown, and what the default Avatar will be if a user does not have a Gravatar.

Site Privacy

WordPress is a platform intended to allow you to share your thoughts and ideas freely and easily with the world. However, there are options to publish to a more limited audience.

The first way is to limit who can find your website. That is done by keeping search engines, like Google, from seeing (known as indexing) your site.

  1. To do this, we’ll start at the Dashboard.Screen shot of WordPress Dashboard
  2. Navigate to Settings > Reading. Normally the box next to Search Engine Visibility is unchecked. If you decide to check the box, it will “Discourage search engines from indexing this site.” It will depend on the search engine to honor your “request”. Some search engines will simply ignore it. Obviously, this is not a sure-fire way of keeping your blog private.reading menu--search engine setting
  3. You also have options on individual posts to keep them private, so that only people who are logged in to your site can view a given post. You can also password protect posts with a password you supply. Choose the Private radio button to keep a post hidden behind the login, or choose the Password protected button and then type in the password you wish to use. Click on OK when you are finished. Then be sure you click the Update button to save your post with the new settings.

Managing Spam: Akismet

SPAM! Everyone hates it in their email. If you’re new to WordPress and blogging platforms, spam exists in the form of comment spam – people (or vermin) leave comments promoting their services or schemes, on a post or page.

So how do you deal with comment spam when it can come in even more often than email spam? Do you have to delete every comment that comes in? Well, the answer to the second question is “no”, and the answer to the first question is, with a plugin called Akismet.

  1. To get started we need to install a plugin. To do this, we’ll start at the Dashboard.Screen shot of WordPress Dashboard
  2. Navigate to Plugins > Installed Plugins.Screen shot of Akismet on plugins menu
  3. At or near the top of the list of plugins that are automatically installed in a new WordPress installation, is Akismet. It is not activated, so part of the process of getting Akismet is Activating the plugin. Before you activate it, however, you need to get something that will be somewhat strange for most people. It’s called an API key. API stands for Application Programming Interface, and it’s a way for programs and services to “talk” to each other. The Akismet plugin requires you to get an Akismet API Key, which is simply a “code” that you supply when activating the plugin. The key is free if you use it on a personal WordPress installation, and it’s available on the Akismet website.screen shot after activating Akismet
  4. Once you arrive on the Akismet for WordPress site, click the Get an Akismet API key button.Screen shot of Akismet web site where you get key
  5. If you have an account at WordPress.com you can sign in with that login and get your key. Otherwise, fill in an email address, a username, and a password to use for a new account. Click the Sign up button to proceed.
    create a wordpress.com account, if you don't already have one
  6. Type in the URL of the site you’ll use Akismet on and click on the Sign Up button under the Personal plan (that is if you want it to be the free version).Select desired Akismet plan
  7. When you get to the next page, the recommended contribution is $36. You can adjust the slider down to $0. The smiley face will begin to frown, but at least your key will be free. Lastly, fill in your name and click Continue.
  8. You’re finished with the sign-up process for your key, and it will be displayed on the page for you (we’ve blurred ours out).Akismet key
  9. Now follow the steps that they show you for using your new key. You will enter the key in either the Akismet area under Plugins or JetPack (if you have that installed).Akismet key

iOS & Android App

You can download the WordPress app from the iOS App Store or the Google Play Store for your mobile device.

Screenshot Setup Tutorial:

  1. When you open the WordPress app, tap on Add Self-Hosted Site:
    log into your WordPress site from your smartphone
  2. Then, you will be able to enter your WordPress site credentials:
    These credentials come from your Installatron page of WordPress. To access these credentials, first find the applications you added with Installatron by clicking on the My Apps icon.My apps icon
  3. Next, click the title of your installed instance of WordPress:
  4. From here, under the overview tab, you can access your WordPress site credentials. You may change your user password by filling in the field next to password, scrolling down, and clicking the Save all button. Note that this sometimes takes a few minutes, so even if it doesn’t look like anything is happening, do not refresh your page after clicking save.
  5. With these credentials, enter them into the WordPress App along with the url for your WordPress website and select Next.
  6. On the next page, you will see all of the WordPress websites you have added to the WordPress App. Continue to the site you just added.
  7. To start a new post, tap on the Pencil Icon:
    pencil icon lets your create/edit blog post
  8. On this page, add your Title and Content. You can edit the properties of text by selecting the text and the different Text Property Buttons:
    Screen shot of Text Property options
  9. To view the progress of your post, select “…” on the top right of the screen and select Preview:
  10. When finished, select Publish:
    Publish post

Now when you visit your WordPress webpage, you will see your new blog post!

Installing Plugins

As you begin to use your Omeka install on Reclaim Hosting you may wish to add additional functionality by way of the various open source plugins available at http://omeka.org/add-ons/plugins/. Although Omeka doesn’t currently include an automated installer for plugins, the process of uploading them to your space is outlined here.

To get started you’ll want to log into your cPanel:

In cPanel you’ll access the File Manager located under the Files section.

In the File Manager you’ll navigate on the lefthand sidebar down to your plugins folder which should be one of several folders within your Omeka install (your root directory for your domain is public_html).

Here you will see all plugins currently in your Omeka install. To add a new one you want to have downloaded the zip file locally to your computer from Omeka’s website first. Then click the Upload button to upload the file.

The interface will allow you to drag and drop or select from your computer one or more zip files for the plugins you wish to upload. Once the upload has completed you can return to the previous screen using the link at the bottom of the page.

You should now see a zip file for your plugin in the plugins folder. The last step is to extract the contents of the zip file to the same folder. To do this select your file and click the Extract button.

Once the plugin is extracted you can delete the zip file and the plugin will now be available for activation within your Omeka administration interface.