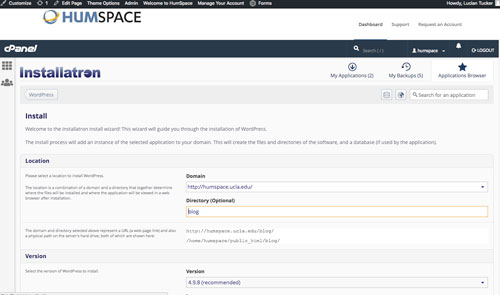
Setting Up Subdomains

A subdomain is one way of organizing and separating content on your site. To create a subdomain, use the following steps:

  1. Log into humspace.ucla.edu with your HumSpace username and password to access your cPanel.
  2. Once logged in, you’ll be at the homepage of your cPanel. The easiest way to navigate your cPanel is using the search feature in the top right panel. Click the Search box and type “subdomains” (without the quotes). When you press enter, you will automatically be taken to the Subdomains page. Or, you can scroll down and click the Subdomains icon under the Domains section of cPanel.
    screen shot of subdomains application
  3. Choose a name for your subdomain and type it into the Subdomain box. Just like top-level domains, subdomains can only contain numbers, letters, and hyphens, and the best subdomains are simple, short, and descriptive.
  4. Once you’ve typed in a name, cPanel will automatically populate the Document root field for you. This will create a folder to contain your subdomain’s files. You’ll usually want this folder to match the name of your subdomain, so it’s easy to identify where different files live in your account. You might want to change the document root if you already have a folder in your account that has the same name as the subdomain you are trying to create, although this should be rare. Once you’re done, click Create.
  5. Once you’re done, click Create. If everything went well, you should see a message that your subdomain was created successfully.

Your subdomain will now be available as an option for automatic installation of various software (WordPress, MediaWiki, etc). If you prefer to install web applications manually, you can do so in the document root (folder) you created in step 5.

Understanding Accounts & Passwords

One aspect of humspace.ucla.edu that users may find a bit complicated at first is understanding the different accounts (and associated passwords) that you can manage as part of your participation in the project. This article outlines the types of accounts that you are likely to have, what they are for, and how you go about resetting passwords on each of them.

Your cPanel Account

When you first sign-up for your domain and hosting, a cPanel account will be generated that provides you with access to your slice of the humspace.ucla.edu web server. Your cPanel account is automatically associated with your HumSpace username. Therefore, your HumSpace username will grant you access to your cPanel account.

Your Application Administrator Accounts

Every time you install a new application in cPanel, an Administrator Account for that application will be created. You will likely use these accounts very often – every time you need to login to your application to manage the associated website, you will use this account.

For example, if you install WordPress to manage your Web site, every time you need to add content to WordPress, change your theme, approve comments, etc. you will use this account to login.

Usually, you will be given the opportunity to choose the username and password for that account. We recommend choosing something that you are likely to remember but that is strong and secure.

Upon installation, you will likely receive an email confirming the user-id/password combination you chose. It will also have information about how to access the login page for that application. You may wish to make sure you don’t delete this message.

Depending on the application you’re working with, managing and resetting the password for this account will vary. If you’ve used Installatron (in cPanel) to install the application, however, you can always review the account credentials:

  • Login to cPanel through https://humspace.ucla.edu/dashboard/
  • Click the Installatron icon in the Software/Services section.
  • Find the application you installed under My Applications.
  • Click the Edit button (this looks like a blue wrench).
  • Scroll down to find the Administrator Username and Password.

In addition, most applications should have some kind of password reset link on the login page. For more information on resetting your application password through Installatron, click here.

Other Types of Accounts

In addition to the account types outlined above, there are a few other kinds of accounts you may have as part of humspace.ucla.edu:

  • When you sign up for subdomain/top-level domain on Stateu.org, cPanel will automatically create an FTP account for you by default. You’ll also have the option of manually creating your own FTP account. You can learn about their differences here.
  • Application User Accounts: In addition to the Administrator Account that you set up when installing an application, most applications will also let you set up user profile accounts within each application.

Setting Up FTP

There may be times when you need to upload files to your website in the HumSpace web hosting environment. There are a number of scenarios when this might be necessary:

  • You’re working with an application that allows you to install plugins/extensions, but the files need to be manually added to your file manager in order to install them. (Note: This is not required for WordPress which allows you to install themes/plugins through the WordPress dashboard.)
  • You’ve developed a custom site/pages using a Web design program, and you need to upload the files you created to your file manager
  • You’re installing an application that isn’t part of applications list in Installatron.

One way to upload files is by using the File Manager that is part of cPanel. However, sometimes you’ll find it easier/necessary to use File Transfer Protocol (FTP) to move files to your site. This can be particularly useful if you’re working with a Web space where you’re not the owner (so you don’t have access to the File Manager in cPanel) or if you need to provide file access to someone else to your space on the Web server. File Manager also only allows you to upload files one by one, so if you’re working with large amounts of data then FTP will be preferable.

What exactly is FTP?

File Transfer Protocol is a method that allows you to remotely move files to a Web server from another location – usually your local/personal computer. Using a pre-defined FTP account (with a username and password), you can configure an FTP client (a program you run on your computer that allows you to transfer files via FTP.

There are lots of FTP clients that you can use; some are free and some are not. A few free ones you might consider:

For the purpose of this tutorial, we’ll show you how to set up FTP in FileZilla, (Cyberduck instructions can be found here) but you should be able to generalize these instructions to use in any FTP client.

Get Information about Your FTP Account

If you’re connecting via FTP to your own space on HumSpace, or if you’re setting up an FTP account for someone else to use, you’ll need to start by getting the proper FTP credentials from cPanel:

  1. Login to humspace.ucla.edu.
  2. In the Search Box at the top of the page, search for “FTP”, and click the FTP Accounts icon that appears.
  3. Every cPanel has an FTP account by default, and you can find those credentials by scrolling down on the FTP Accounts page. You also have the option to create a new FTP account, which can be done by filling out the Add FTP Account form with a username and password. Unless you change it, the new FTP account will be limited to a directory with the same name as the account you’re creating. You can change this to a different directory, if you want to grant this account access to a different location.  NOTE: Make sure you know/remember the password you enter. When you’re done, click Create FTP Account.
  4. Once you’ve created the new account, you’ll see it appear in the list at the bottom of the FTP Accounts page. In addition to any accounts you’ve created, in the Special FTP Accounts section, you’ll see the default FTP Account. You’ll know this account because the username corresponds to your cPanel username. This FTP account has full privileges to access all directories within your cPanel.
  5. For whichever account you need credentials for, click the Configure FTP Client link.
  6. Write down the username, server, and port information that appears. You will need to use this (or you will need to provide this to the person you are giving FTP access) along with the password you created in Step 3 in order to configure your FTP client.

PLEASE NOTE:

For cPanel’s default FTP account, use the following settings:

-Connect via SFTP (more secure than FTP)
-Port: 22

For an FTP account that you manually created (shown in Step 3 above), use the following settings:

-Connect via FTP (cPanel doesn’t allow an SFTP connection for manual accounts)
-Port: 21

Configure FTP in Your FTP Client

Below are links to tutorials for setting up both FileZilla and CyberDuck to connect to your FTP account.

For further assistance on FTP, read this guide.

Signing Up

Review the Guidelines

Before you get started, we recommend that you review our information about Choosing a Domain Name.

The Sign-Up Process

Once you’ve reviewed the guidelines, you can proceed to the sign-up page.

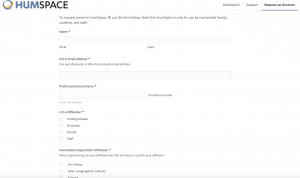
  1.  Click on the “ Request on Account “.
  2.  You will be redirected to the form which will be look like.
  3. Once you will submit the form, you will get the confirmation email of submission.
  4. Once it is approved you will get an email with Username, Password & Domain name.

WordPress Export/Import

If you are using your WordPress, you can also get an export of your posts, pages, comments, custom fields, categories, and tags.

The WordPress export is great for grabbing the content of your WordPress site so that you can import it into another WordPress host, such as WordPress.com or WordPress.org.

Note: Exports do not include plug-ins, or other site customizations.

Exporting

  1. From the Dashboard navigate to Tools>Export
    The screenshot below shows how to export all of your posts, pages, comments, custom fields, terms, navigation menus, and custom posts. However, you can also export just certain posts, pages, or media. The export page within WordPress

This export process generates an XML file of your blog’s content. WordPress calls this an  eXtended RSS or WXR file.

Note: This will ONLY export your posts, pages, comments, categories, and tags; uploads and images may need to be manually transferred to the new blog. If possible, do not delete your blog until after media files have successfully been imported into the new blog.

Importing

Once you have exported your posts, pages, etc., you can import them into your new WordPress site.

  1. Login to your new WordPress.com or self-hosted WordPress site and go to the Dashboard.  From there navigate to Tools>Import and click on the link to “Run Importer
    Screenshot showing where to find the WordPress Importer
  2.  Next you will see a screen that prompts you to upload the WXR (.xml) file you generated through the export process. Browse to your exported WordPress archive and then click the “Upload file and import” button.
    Upload file and import
  3. Choose and upload your file.  You will then be prompted to assign an author to the posts that you are importing.  You can use this function to assign one author to all posts, or you can manually set the author for each post in the posts menu. Unless you have a space limit, you will also want to select the option to “download and import file attachments” before clicking the “Submit” button.
    Select desired import options and click the
  4. When your import is complete, you will see a confirmation screen.
    Confirmation screen

Your exported content is now added to your site. If you had posts on your site prior to importing, those posts are still available.

Because the export did not include themes or plug-ins, you will need to reinstall those separately from the export/import process.

Choosing Your Domain Name

Choosing your domain name is the first step in getting started with staking your claim on the web. Your domain name is a unique Web address (e.g. yourname.humspace.ucla.edu) that can be used to build out your own digital presence. As you make your choice, there are a few considerations to keep in mind:

Your Domain Name Must Be Available: Domain names must be unique, which means in order for you to claim your own, you need to be sure that it is currently available (and not being used by anyone else or any company or organization). There are lots of tools to check on domain availability, and when you sign up on humspace.ucla.edu, we’ll actually check the availability of your choice for you. If you’d like to spend some time thinking about your choice and checking availability before you actually sign-up, we recommend using whois.com.

Choose a Domain You Can Live With: You should choose a domain name that you feel you can live with for quite some time. You should pick something that you won’t find embarrassing in the future. A good rule of thumb is to pick a domain that you would be comfortable putting on a future job application.

You May Wish to Include Your Name in Your Domain: There is no requirement that your domain reflects your specific identity in the form of your first and last name. However, choosing a domain name that includes your name may make it easier for you to achieve higher rankings in search engines when someone queries your real name.

Pick a Domain you Like: At the end of the day, your domain should reflect you. Pick a domain you like and are proud of. It can reflect your interests, sports you play, or your hobby. Or it could just be your name. The “right” domain for you is the one you’re comfortable with.

File Structures and the File Manager

Web hosting is, at its basic core, files and folders on a computer that is connected to the internet and setup to distribute them. How that computer (typically a server) is set up to do that is covered more in LAMP Environments but this article will explain the idea of the file structure and how it relates to what you view on your domain.

When you signed up for your domain, a web hosting account was created. Although you typically will interact mostly with the web interface to create subdomains, install applications, and other common tasks, you might occasionally also need to work directly with the files in your account. The File Manager in your cPanel is one way to see these files. You can also create an FTP account in cPanel and use an FTP program to interact with these files (FTP stands for File Transfer Protocol, and it’s a way of using a desktop client to transfer files to and from your Web server space).

Let’s take a look at the File Manager built into your cPanel to get a better understanding of the file structure that makes up your website(s).

  1. Login to cPanel with your username and password.
  2. On the homepage of your control panel, you’ll have all the various tools listed. You can easily find the File Manager by using the search tool in the upper righthand corner and typing File Manager. You can also find its icon under Files.
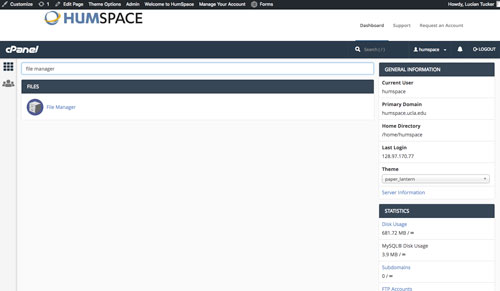
  3. You are now sent to the File Manager and can navigate the folder structure there.

You’ll notice when the File Manager opens up that this looks very much like a folder on your computer. There are a few folders in it as well as files, and you can navigate down into those folders and see what’s inside of them. At the top level of the File Manager, you also have the option of interacting with files and folders you select by moving them around or removing them. There is a larger article all about how to use the file manager at Accessing Your Files through the File Manager so we won’t talk much about how the interface works here. Instead, we’ll cover what those folders and files actually mean and how they relate to what someone sees when they visit your website.

By default, you have a variety of folders at the root of your web space (the first screen you see when you open up the file manager). Some of them are created automatically to store information about the panel and setup of certain sites. These folders are things like access-logs, etc, ssl, and tmp. You can safely ignore most of those folders because they don’t correspond to actual websites. Let’s look at which folders do and how it all works.

Your main domain will correspond with a folder called public_html. Whatever files and folders are inside of this folder are available on that main domain. If you installed WordPress here you’ll likely see a lot of WordPress-related files within it (which were probably helpfully put there by the automated installer). Let’s say we uploaded an image called mypicture.jpg directly into the public_html folder. That image would now be available at yourdomain.com/mypicture.jpg. The slash after your domain implies “this file is inside this folder”. But what if we had a folder inside the public_html folder? How does that appear? This is typically called a subfolder so let’s put a folder in public_html called “images” and put our image, mypicture.jpg, inside of that folder. What would you type in a browser to get to that file now? The location would be mydomain.com/images/mypicture.jpg. So subfolders are also indicated by a forward slash after a domain.

What about subdomains? You can have completely separate sites called subdomains that appear as nameofsubdomain.yourdomain.com. But where are they in the file structure? When you create a subdomain, cPanel will ask you to give the subdomain directory a name. If I had a subdomain called photos.mydomain.com for example, I might want to name the folder “photos” (by default your control panel will call the folder by the name of the subdomain). Folders for subdomains are located inside the public_html folder. So when you go to the File Manager and navigate to public_html, you’ll see folders listed for all of your subdomains and once you navigate inside one of those folders, you’ll see files and folders specifically for that subdomain that appear on the web at that subdomain’s address.

File Manager in cPanel is great to view these files and folders, but it can be limiting if you want to upload an entire folder of information to your website. If you find yourself wanting to do more with the files and folders on your web space you may want to consider using File Transfer Protocol (FTP). FTP will allow you to upload and download files to and from your File Manager (i.e. your website) in bulk. For information on using FTP, click here.

Export your domain

To export your domain, we will create a backup of both the files in your domain and the databases that your domain draws from.  First, click on the ‘Manage Your Account’ menu at the top of your screen and select ‘Migration Information.

  1. To get started you’ll need to login to your control panel (https://humspace.ucla.edu/dashboard) using your HumSpace username and password.
  2. Once you’re logged in, you’ll see the cPanel interface.  Now click on the Manage Your Account menu at the top of your screen and select Migration Information.
  3. To create a backup of your files and databases, simply click the button labeled Add Backup. The system will take a moment to create a backup. When it is complete, you will see the new backup appear below the button. You can click on this backup to download the file.

Accessing Your Files through the File Manager

Your HumSpace cPanel includes a File Manager that allows you to interact directly with the files stored in your web hosting account. This can be useful if you want to upload software that cannot be automatically installed via the Web Applications section of your cPanel, if you need to change the name or permissions of a file or group or files, or if you want to edit a plain text file. To access your files via the File Manager, use these steps:

  1. Login to humspace.ucla.edu with your username and password.
  2. Once logged in, you’ll be on the homepage of your cPanel. The easiest way to navigate your cPanel is by utilizing the search bar in the top right panel. Search File Manager. When you press enter, you will be automatically redirected to the File Manager.  You can also find the File Manager icon under the Files section.
  3. On the left side of the “File Manager” window, you’ll see a navigation menu containing the file structure of your web hosting account. More information about the contents of these files and folders can be found in the File Structures and the File Manager documentation article.
  4. In the navigation menu, choose the public_html directory. This will take you directly to the folder that contains the files associated with your website(s). You’ll notice your current location (the public_html folder) is bolded and highlighted in this menu. Click the [+] (expand) icon next to a folder to see what subfolders it contains, or click on the name of the folder to view all of its contents in the file browser on the right side of the page. You can also navigate through the folders in your account by double-clicking on them in the menu on the left side of your file manager.
  5. To select an item, click once on its icon in the file browser. You can also use the “Select All” button above the file browser, or your computer’s keyboard shortcuts (Shift, Command, Control, etc), to select multiple items from this list.
  6. Depending on what you have selected, different options will be available to you in the action menu across the top of your file manager. For example, if you have selected a folder, you can rename it or Change Permissions on it.
    screen shot of file manager tools
  7. If you know exactly what location you want to skip to within your web hosting account, you can type it into the box directly above the navigation menu and click Go.
  8. Alternatively, if you know the exact name of the file or folder you are looking for, but not its location, you can use the Search box to find it.screen shot to find file by name

Unlock your domain

This article only if you own your own top-level domain. If you have been using the free subdomain option with humspace.ucla.edu through HumSpace, this does not apply to you.

Similarly, if you’re migrating your content to Reclaim Hosting, this article does not apply to you.

Transferring a domain you already own is not too much different from registering a new domain, except the transfer process requires an EPP code, or an agreement code between your old registrar and your new registrar that allows the release of your domain. Your new registrar will have information on how to transfer in a domain. When you start that process, you will be prompted to enter your EPP code.

How to find your EPP Code:

  1. To get started you’ll need to login to your control panel (https://humspace.ucla.edu/dashboard) using your Haverford username and password.
  2. Once you’re logged in, you’ll see the cPanel interface.  Now click on the Manage Your Account menu at the top of your screen and select Migration Information.

3. Click the Lock button to unlock your HumSpace account.

4. Click Get Code. Once that’s done, the system will send you an email with your EPP code.

At this stage, here are a few items to note:

  • You’ll receive a series of emails from both your old and new registrars asking you to authorize the transfer. Please act on every email you receive in a timely fashion– even if the emails look like duplicates.
  • If you do not authorize the transfer in a timely fashion, the domain transfer will expire and you will need to start over.
  • The domain must be older than 60 days.
  • The domain must have no other transfers in the last 60 days.
  • The domain transfer process can take up to a week, depending on how fast your registrars work.
  • Once the domain transfer completes, you’ll receive a notification.